This guest blogger is one of our favorite crafty ladies, Amanda Formaro from Crafts by Amanda. She’s shared an adorable craft that will make your holiday dinner festive and fun:
“Looking for a different but fun place setting for the holidays this year?
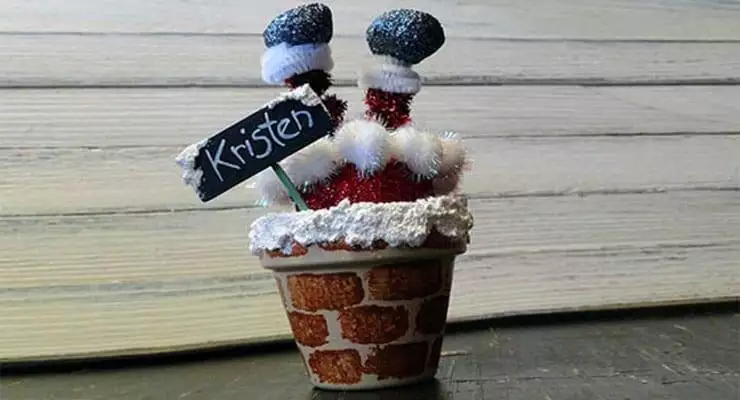
This glittery Santa is full of sparkle and he’ll induce some dinnertime giggles as well. A fun addition to your Christmas table!
Materials
- 1 small terra cotta pot
- Acrylic or outdoor paint: cream and reddish-brown
- Black chalkboard paint
- Snow texture paint
- 1 Medium Styrofoam egg
- 1 Small Styrofoam egg
- 2 Glittery red chenille stems
- 1 White chenille stem
- 10 Small glittery white pom poms
- Fine glitter: red and black
- 2 toothpicks
- 1 small wood rectangle (cardboard will work too!)
- Household sponge
- Paintbrush
- White craft glue
- Hot glue gun
- White chalkboard pen
- Cotton balls
Directions
First, paint your terra cotta pot with cream paint. Allow it to dry, then use a small rectangular piece cut from a household sponge to add the reddish-brown bricks. Let dry.
 Apply snow texture paint to the rim of the pot using a palette or a paintbrush. Set aside to dry.

Fold a red chenille stem in half and cut to create two equal pieces. Twist the two pieces together to form one thicker piece. Repeat with second chenille stem. Now coil each of them around a pencil or pen, slide off.

Cut the small Styrofoam egg in half lengthwise, these are Santa’s boots. Insert a coiled chenille stem into the round half of one of the egg pieces. Repeat with other chenille stem. Coat the “boots” with white glue and sprinkle with black glitter. Tap off excess and set aside to dry.
Insert a toothpick into the smaller end of the large Styrofoam egg. Paint the larger end with white glue. Sprinkle red glitter all over the glue and tap off excess. Set aside to dry (hint: if you have floral foam stick the toothpick into the foam. If not, simply use a cardboard egg carton).

While the painted pot and the glitter eggs are drying, paint the wood rectangle with black chalkboard paint. Hot glue the second toothpick to the back of the “sign”. Use chalkboard pen to write your guest’s name on the sign. Add some snow texture paint to the top of the sign. Allow everything to dry.
Place 2-3 cotton balls inside the clay pot. With toothpick pointing down, insert the large red glitter egg into the pot. Pull additional cotton balls into pieces and tuck them into the pot around the glitter egg to help support it.

Cut white chenille stem in half. Carefully twist around Santa’s legs to create pant cuffs. Secure with glue.
Insert the chenille legs into the red glitter egg (Santa’s bottom) and secure with white glue. You can create small holes in the egg first by poking a pencil into it, then inserting the chenille.
Hot glue the white glitter pom poms in a circle around the red glitter egg to create the bottom of Santa’s coat.
Insert the personalized sign into the terra cotta pot and secure with glue.
Ho ho ho! You’ve got yourself a Santa!
Amanda Formaro is the crafty, entrepreneurial mother of four children. She loves to bake, cook, make kid’s crafts and create decorative items for her home. She is a crafting expert and guru in the kitchen and has appeared online and in print publications many times over the years. She is also the editor for the Home & Garden channel at Craft Gossip and owner of FunFamilyCrafts.com. You can see her crafty creations on Crafts by Amanda and her delicious recipes on Amanda’s Cookin’