 After conquering a giant community sculpture by which an entire school came together to create, I decided it was time to scale things down a bit.
Using our newfound knowledge and talents for material manipulation and the power to make whatever we wanted with our hands, we focused in on something of our own. Something each child could focus in on and take home to display with pride. An individual sculpture was just the thing.
(Cue the theme music from Ghost).
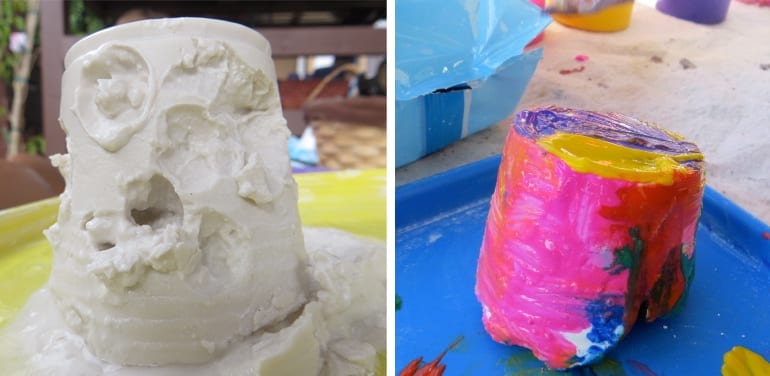
Inspired by artist Henry Moore, my students explored the powers of plaster, the concepts of carving, and the notions of negative space! We created our own unique sculpture using simple tools such as forks, spoons, wooden poles, and in many instances, simply our hands. The challenge came in making tunnels and holes in the plaster without breaking it apart, so that when the sun would hit our creation, it would cast shadows and shapes on the ground, showing the importance of the space left in between.
It was so simple and yet brought about such a sense of effort, time, and creativity as each child worked to find their perfect shape and texture, devoting so much to something that fit right in the palm of their hands.
How to do this at home:
Supplies
- Plaster of Paris
- Clear plastic drink cups (I used 10 0z., but it’s entirely up to you and your sculptor)
- Household “carving” tools: forks, spoons, popsicle sticks…get creative!
- An array of washable tempera paint and paintbrushes
Directions

To create the plaster molds, simply follow the instructions on your plaster package, using your beverage cup as a measuring guide. Mixing equal parts water and plaster should be perfect; or if making multiples, mix larger quantities in a separate container and have your children help you stir and then pour into the cups to get them more involved in the full process.
The plaster will take roughly an hour to harden in the cup, and by using clear cups, your children can watch the changes happen before their very eyes. You can also choose to leave it overnight if desired. (If it gets literally hard as a rock, you can always wet your hands to manipulate and soften a little.)
Use scissors to cut vertically from the top to the base of the cup, allowing you or your child to peel the cup away, revealing the plaster form underneath. (This was always the most exciting part!)
From there, use any of the carving tools suggested or simply wet hands and go to town creating!
.jpg)
Tunnels, grooves, designs- you will be amazed at what they come up with using simple utensils in brand new ways. (Fork stripes and chevrons, anyone?)

Allow the plaster to set and dry once more, in the sun if possible for quickest results. Once dry, allow your child to paint, decorate, and bedazzle to their heart’s content. Enjoy!
After a day or two of drying, my fabulous little artists focused on the finishing touches of their custom creations.
They were amazed at how the plaster had hardened from its time in the sun and was ready to be adorned with the colors of the rainbow (and consequently, due to popular demand, some glitter to top it off.)