I’m a huge fan of ModernMom and couldn’t be more thrilled to contribute to this amazing resource for parents. I will be sharing with you my planning tips, theme ideas, craft projects and some great finds to make your next party unique and fabulous!
Today I want to share with you a party theme that is close to my heart and will appeal to any family with little girls….
A SLUMBER PARTY!
We all know that little girls love to have sleepovers and a Slumber Party theme is a fun and easy way to celebrate your daughter’s birthday with her closest friends. Even if you are not quite ready to invite your guest to stay the whole night, you can still give them a taste of what having a good ole’ sleep over is all about! My daughter Kate is only two but I can’t wait for those days when my house is filled with the late night giggles of a half dozen little girls pretending to sleep!
Encourage your guests to come dressed in their favorite PJ’s, bring their stuffed animals or faithful blanket and don’t forget their pillow! Greet your friends at the door with prop (ie:eye mask, slippers, headband, etc…) or a lite snack to get the evening started. When hosting a children’s party it is always a good to provide a clear schedule to keep their little minds entertained and excited about the next activity. Like any good event their needs to be a beginning, a middle and an end!
Having a fun craft activity is a great way to captivate your audience and it offers your guests a sweet gift to take home as a memento of the day. For this party, we stuck to the theme and set up a Pillow Decorating Station (DIY tutorial featured below). The girls can enjoy their creation that evening or take it home and display it in their own bedroom.
After the girls are finished with their craft you can invite everyone into the kitchen for a bite to eat. Feel free to offer them breakfast, lunch or dinner depending on what time of day you are having your party. However, pancakes can be enjoyed at any hour of the day…just saying!
If you really want to dress up the space, you could set your table as a bed. Create a tablecloth from a sheet, make a headboard out of cardboard for each end of the table and add a pillow to each seat for cushion. Set out place settings with each child’s name in the shape of a sleeping mask or leave personalized slippers under the table for each girl.
After a delicious meal the girls can grab their pillows and head into the family room to watch their favorite movie! You want to make sure to include “movie” snacks as well! (Target usually has great durable popcorn boxes in the dollar bins that could also be a nice gift to take home.) After the movie you can bring out the birthday cake and they can open presents!
If they are not staying overnight this is about the time to bid your friends farewell or for those staying over you may want to put on another movie or play an interactive game like charades. Depending on age, you could also provide polish for painting nails or a couple different board games.
Parties are always memorable events but having a cohesive theme will set your party apart and is guaranteed to leave your daughter with a grin from ear to ear!
DIY PILLOW DECORATING STATION

Supplies
- Pillow Cases
- Scissors
- Iron
- Glue Gun
- Iron On Decals
- Flowers
- Felt
- Fabric
- Ribbon
You can always add more to the decorating but here are just a few things to get you started!
Directions
1. The first step is to iron your pillow case so that is wrinkle and crease free!
2. Once you have ironed your pillow case you are ready to start decorating! Today we decided to use this fun CUPCAKE decal! You put the decal on the pillowcase where you want and iron it on!
This takes about 2 minutes total and each decal is a little different so make sure you read the instructions!

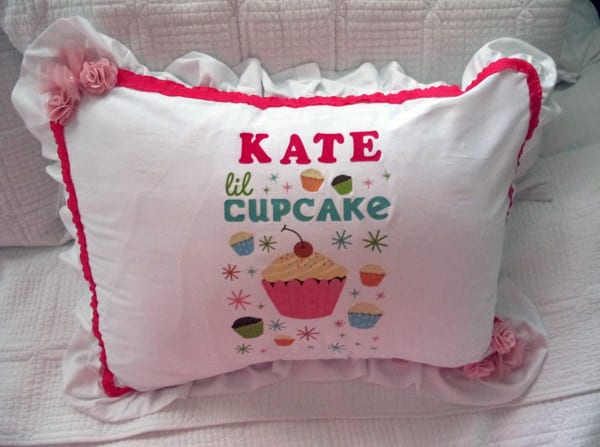
3. The next thing we decided to do is personalize the pillowcase with a child’s name. We bought alphabet decals and cut out the letters to spell KATE and ironed them on!


4. We found some fun ribbon and decided to JAZZ the pillow case up by hot glue-gunning the ribbon around the perimeter of the pillowcase.


5. We added some flowers to each corner and used a hot glue gun to attach them to the fabric.

Voila! The pillow case is complete!

This entire process took a total of 15 minutes. Super easy and super fun and the kids can then use this pillow case to watch a movie later on and take it home with them!