About a dozen years ago, my siblings talked me into buying a cottage with them. It has worked out great – we share the cost and the work among the four of us, and the property gets a lot of use! On the rare occasion we’re all there at the same time, it makes for eight adults and 12 kids enjoying all the good stuff cottage country has to offer.
Now, I’m not one to blog about home renovation or crafts, because I’m just not very “crafty” or “house-y”. But, I have a sister who is and she recently completed a DIY project at our cottage that is so fabulous and worth sharing.

IN HER WORDS:
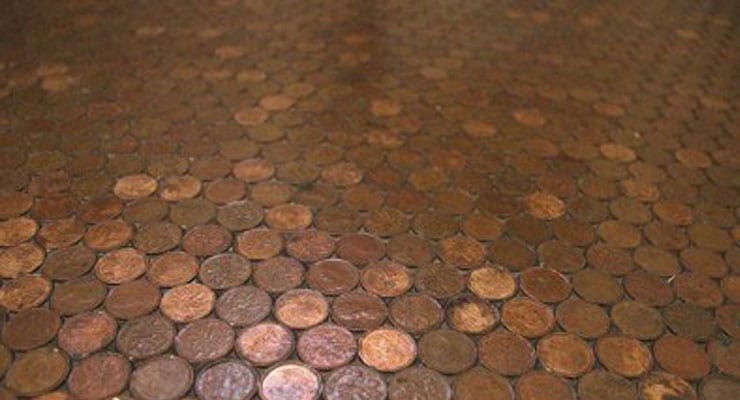
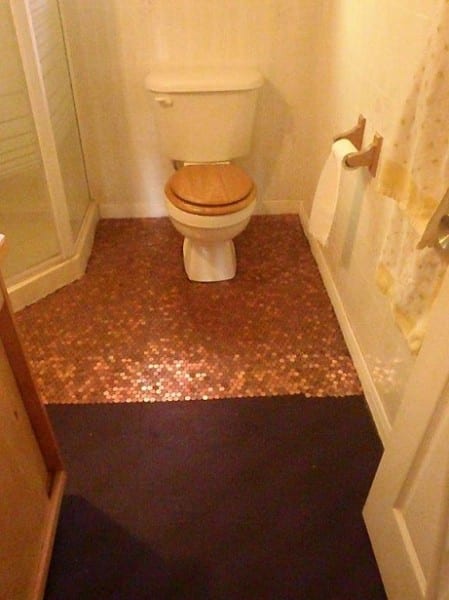
Since the penny was being discontinued in Canada last year, I wanted to pay it homage with a special DIY home décor project. Our not-so-special bathroom seemed like the perfect spot where the penny could live in our consciousness long after its demise.
What’s needed?
- An ugly floor*, preferably vinyl or laminate flooring and small, depending on your commitment to this project
- Wax stripper
- Floor cleaner
- Paint
- Glue
- Pennies, but if you’ve got deep pockets, loonies would be cool
- Polyurethane cuz it’s a hard finish
- A Sealer – I used BeautiTone Epoxy Clear Coat 2 part Sealer
*pennies also stick to pretty floors

How I did it
- We started with a vinyl floor that was in pretty good shape so I didn’t have to remove it.
- I stripped it of wax and gave it a good washing.
- I then painted it with a flat black paint, but you can use whatever colour you want to show through.
- I used Weldbond glue to adhere the pennies to the floor, but any good glue would work – don’t go with the super expensive stuff – it really isn’t necessary since you’ll be sealing the whole thing down anyway. The Weldbond was good because it didn’t dry immediately so I was able to fix any oopsies, but once it dried the pennies really stayed put. Put a small dot in the middle of the penny.
- If you’re fastidious, the trickiest part is laying that first line of pennies down. Since it was a cottage, I wasn’t really fussed about the straight lines, and would be putting down quarter round to cover up the rough edges anyway. If you start off with a straight wall, you’re laughing. If not, you’ll have to draw a straight line on the floor. At some point you’re going to have to temporarily remove the toilet in order to get a smooth look to the pennies around it. Our toilet was raised a couple of millimeters so I was able to slide them under it.
- Once that first line is down, it’s just a matter of continuing from there.
- As far as colour goes, you can wash all your pennies through various means: vinegar & salt, lemon, baking soda, coca cola, etc. to get a nice shine, or just live with their current patina.
- You can create designs based on the colours of the pennies, but I just laid them down as they came to me. Some were vandalized, painted red or white, they went down. Some came from our friendly neighbours to the South, they went down. We have Irish roots plus English and Australian relations, those pennies, though different sizes, made it into the corners of the floor. We’ve got Queen Elizabeth from when she was a girl to her current state of being. We’ve got King Edward. We’ve got Maple Leafs and Rock Doves (yup, pigeons). We’ve got a row of pennies representing each child with the year of their birth, tails up. No matter what you do, it’s bound to be beautiful.
- Once the pennies were all down, I covered them with a coat of high gloss polyurethane to make it hard and shiny.
- Then the epoxy sealer.
- Staying down there on the floor was hard on the back, but since it was the cottage I did it over the course of a week and took lots of breaks…trickier to do this on a floor that you use every day.
- Just make sure you let each stage thoroughly dry, (which I didn’t mind, because I did my waiting down on the beach.)
- And there you have it! A floor that makes a lot of “cents”! So what do you think? Are you ready to beg, borrow and steal pennies to create this thing of beauty in your home? What’s your favourite DIY or home décor project?
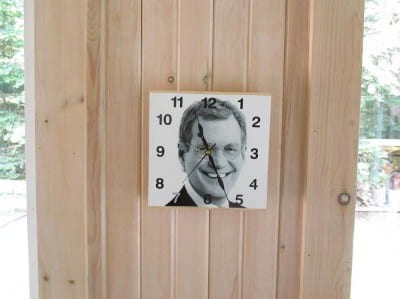
- Because my sister is not only crafty, but a little crazy – her next “paying homage” DIY project involves a “Good-bye Letterman Clock”. I’ll let you know how that one turns out!