At ModernMom.com, we want to be transparent with our readers about our editorial practices. This article may contain affiliate links, which means that if you click on a link and make a purchase, we may earn a commission from the retailer.

Ready to sprinkle some festive magic around your home? 🎄
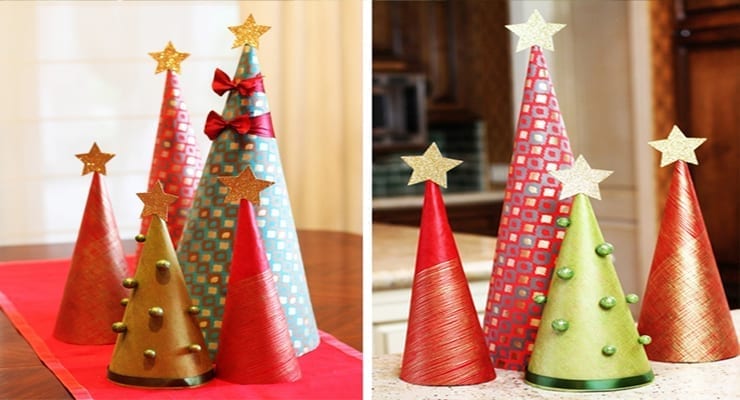
Decking out your place for Christmas can sometimes break the bank, but fear not! This year, I’ve got a jolly idea that won’t cost you a sleigh-load of cash. Get ready to transform your space by crafting your very own Christmas decorations using colorful wrapping paper. Mix and match various patterns to create a merry array of unique ornaments!
With just a handful of basic supplies, you’ll be on your way to crafting some seriously adorable decor. It’s as easy as gingerbread cookies and twice as charming! 🎁✨
Supplies
- Wrapping paper
- Construction paper
- Tape
- Scissors or this tool!
- Glue (either spray adhesive or a regular glue stick)
- Decorative accents like ribbon and beads
- Hot glue gun
Here’s how to put together these adorable wrapping paper Christmas trees:
Using sturdy construction paper you want to create a cone. If your wrapping paper is super thick you don’t have to do this step but if you are using thin wrapping paper you will need to do this.
I used four pieces of construction paper for the largest cone. One piece of construction paper makes the 12″ cone.
Roll your construction paper at a diagonal, keeping the point tight in your hand.
Tape the paper together so you have a sturdy base. It doesn’t matter what this looks like. It’s going to be covered by the wrapping paper. Cut the excess paper off your cone so you have a completely round base. This needs to be straight.
Alright, now pick your paper. Pick something pretty that you want to keep around for a while – you can use these decorations year after year. Flip your paper over. Pretty side down. Using a small piece of tape. Tape the corner of your paper to the point of your cone.Tape the corner of your paper to the point of your cone and slowly start rolling the paper around it. Make sure to hold the paper tight to the cone.
Cut across your paper to create a straight edge. You can continue rolling the paper until it ends but this doesn’t look as good. If you cut a straight edge you will have one seam in the back.
Using double sided tape, place a couple strips on the inside flap and seal the seam. Cut off the excess paper. You can cut the base as short as your construction paper cone inside or if you are using really think paper you can leave it a little longer.
Embellish with whatever you want. I used glitter paper for the stars on top (and used a glue gun to attach them). You can also tie ribbon down them or glue buttons and beads to look like ornaments. Get creative!
Want to watch Jessie take you through this project step by step? Check out the video below: