This project comes from, Jessica Begum, the crafty momma behind the blog Hipster’s Tea Party:
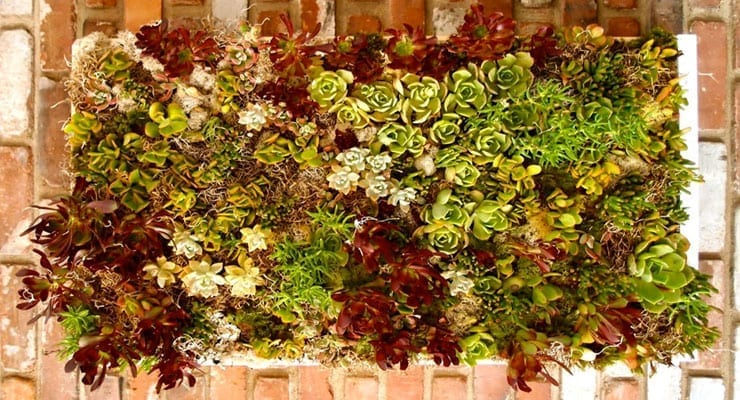
“I am seeing some amazing vertical succulent gardens out there, and was inspired to make my own. It’s a fairly simple process but does take some time and TLC.
Mine hangs above my fireplace, and find it does best when I take it outside for a week to soak up the sunshine every 3 to 4 weeks or so. Here is what you need to try this yourself.”
Supplies
- A shallow wooden box. (I used an 22 x 36″ Ikea drawer I took off an old wardrobe. You could cluster a few smaller ones together if you want to make your own boxes. You could even use a picture frame by nailing a piece of plywood behind it.)
- Galvanized 1/2″ mesh. (Available at Home Depot)
- Wire clippers
- Staple gun
- Hammer
- Succulent potting soil
- Heavy duty picture hanging hook and wire – 100 lbs if you are making one as big as mine.
- Lots and lots of succulent clippings. (So, I must confess, I took a shopping bag and a pair of clippers on a walk in my Southern California neighborhood. Succulents are so amazing! You just need a small starter to make this work. Well, lots and lots of small starters. Just break off a small piece of a larger succulent plant, and stick it in soil and it will grow. Not kidding!! Thank you neighbors! If you don’t live in an abundant succulent neighborhood like I do, you can buy larger plants and break them up. You need about 1/2″ stem on them. I picked mine over a couple of weeks. You can let the clippings air dry for several days until they crust over.)
- Decorative moss
Directions
Start by covering your wooden box with the galvanized mesh. The best way is to staple down one side securely and then pull tightly and have a partner staple the other side. Staple all sides down and then clip your leftovers. Careful about leaving hanging wire. It’s super sharp!

Before you load it up with heavy soil, turn the box over and attach a picture hanging wire on the back. I did this in two places so I could turn the box every couple of months for even growing.

Tip: Use better hangers then I have pictured. Those little eyehooks didn’t stand a chance and I ended up re-doing them with something much stronger.
Then, pour in your succulent soil. Once you think you’ve got enough, water thoroughly and add more soil, packing it in place.

Tip: Do this in a place you can leave it be for a month or so. It’s going to be heavy with all that water!
Then just start sticking your succulents in! I let my 4-year-old daughter do this part, and she loved it! And it made my pattern totally random. You could make a pattern too. Stripes??

Now, water again and leave horizontal in a nice sunny spot outdoors for 4 to 6 weeks until the succulents have a chance to root. The more sun the better. Water frequently.
Once the succulents have stabilized, you can hang it up. You may want to wait a week or so until after your last watering to hang, because the thing is darn heavy with a lot of water! When hanging, use a couple of nice big nails to distribute the weight. I even put a shelf (from Ikea) under mine for extra support.


Once it is in place, fill in the spaces with decorative moss so you don’t see the galvanized mesh.
Then, get ready to explain over and over again how you did it! Because, everyone will be asking 😉
Happy planting!