Dancing around the Maypole is lovely European tradition usually celebrating Mayday. But, in many countries, it’s a dance that takes place all summer long.
Now, obviously it is not May, so my version of this sweet tradition is to welcome summer and was the perfect accessory to my 3-year-old daughter’s birthday party! We had so much fun dancing around the Maypole, and we know you will too!
Here are some simple steps to make your very own Maypole:
Supplies
- 8′ x 1 1/4″ PVC pipe
- 1 1/2″ PVC cap
- Heavy umbrella stand
- Acrylic paint
- Sandpaper and mask
- 10 different 10′ x 1 1/2″ colored ribbons
- Hot glue gun
Directions
Begin by sanding your PVC pole a bit until the shiny surface is dull. This will help adhere the paint to the pole. Make sure to do this outside and wear a mask. You don’t want to breath in PVC dust. Yuck!
Once the pole is nice and dull, you can paint it any color you fancy with acrylic paint. Get your kids in on this step, mine loved helping out. You can paint the PVC cap a coordinating color too. Let dry completely.

Once dry, hot glue the ribbons inside the cap by gluing down 5 ends – evenly spaced, and then the remaining 5 on top, alternating so you get evenly placed ribbons. Make sure your shiny side is out!

Then, put your cap on the top of the pole, and hammer down gently with a mallet or a hammer and cloth. It should fit snugly.

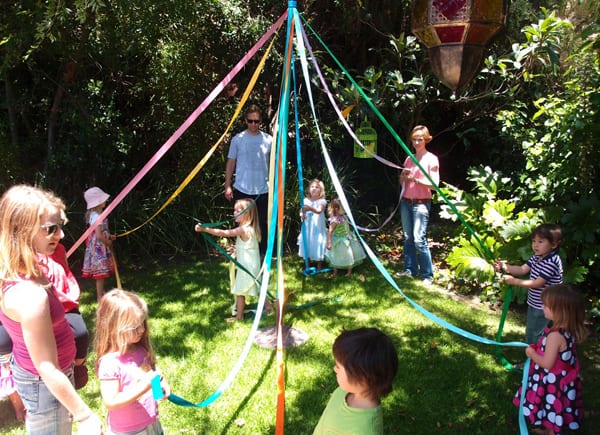
Once completed, you can stick it in the umbrella stand. I pulled my ribbons out evenly and weighted them with river stones. That way everyone knew exactly where to stand. There are many danced to the Maypole, depending on the maturity of your crowd. Since it was for my three-year-old’s birthday party, I had all of the kids choose a ribbon and just walk around it in a circle. They loved seeing the twisty pattern the ribbon made around the pole.

Then, for the second dance, I got the parents involved. We all teamed up with a child and weaved in and out of one another in a slightly more complicated dance. Basically, everyone turns and faces a partner, so half of the dancers are facing clockwise, and the other half are facing counterclockwise. To start the dance, the clockwise half move out, while the counterclockwise half move in. Then, the counterclockwise half move out and the clockwise half move in, so the dancers are weaving in and out of one another like a figure 8.

This was hilarious!! We had so much fun! One of my good friends accused me of exploiting my guests for my craft blog. How right she was! HA!!