With Valentine’s day approaching, here is a fun and thoughtful craft you can do with your kids for your spouse, grandparents, aunties or BFF’s.
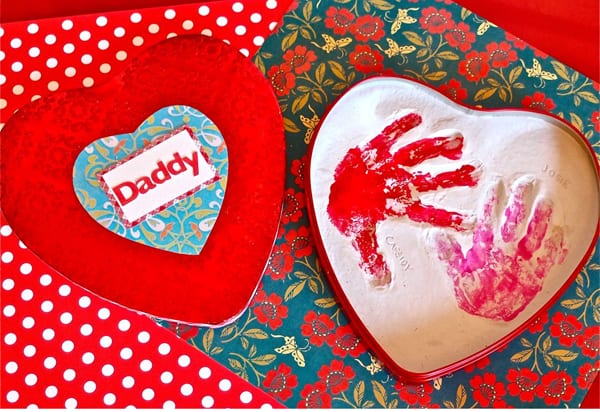
You can transform a simple candy tin into a heartfelt memory your receiver will cherish for years to come. My girls and I just loved making this for their Daddy, and I lnow he is going to love it!”
Supplies
- A heart shaped candy tin. (Mine was a “Mrs. Fields Assorted Chocolates” tin, measuring 8″x 8″x 1″.)
- Decorative paper
- Spray glue
- Sand paper
- Plaster of Paris – Available at any craft store
- Acrylic paint
Directions
First thing you do is cover part or all of your tin with decorative paper. One of my favorite things to do as a paper crafter is to choose contrasting papers that look great together. Take your time choosing papers and put together pattern combinations you might not think go together. Be careful not to choose too many patterns – two or three will do the trick.

My tin had a decorative embossed floral pattern on the top that I chose to display, so I just covered the center heart with paper. To do this, I turned the lid over and taped a upside down piece of decorative paper over the embossed center heart. I used a boning tool to score the edge of the heart, and then cut it out.

I covered the heart on the front lid, and placed a heart on the inside of the lid as well, so I could write a little message. You are welcome to cover the entire tin with paper too. That was actually my original vision for this project. I also covered the bottom and the sides of my tin.
To get the perfect shaped heart to cover the bottom or top of your tin, trace the candy holder insert and cut out. I then used a piece of coordinating paper to frame a name tag on the front and a message on the inside of the lid:

I used letter stickers to write out the recipients name on the front of the tin. “Daddy.” 🙂 Use spray glue to secure all paper into place.

Once your tin is covered in paper, take a piece of sandpaper and sand the bottom of the inside of your tin. This will help the Plaster of Paris stay put.
Then mix the plaster in a disposable container according to the directions on the box. Use a disposable spoon or a pair of chop sticks to mix. I used 1 1/2 cups of plaster for my tin.
You want to fill your tin about 1/2″ full. Too much plaster will make it too heavy. Do not use something you have to wash out, you don’t want this stuff going down your drain.
 When you first mix the plaster, it will be very liquidy. Pour it into the tin. Don’t worry, it firms right up!
Wait about 10-15 minutes before testing it. As you wait, you can shake the pan gently to see how the firming process is going. If it jiggles, wait a bit more. You can test it lightly with your finger tip.
Once it is firm enough to take a print, place your little one’s hand firmly in place and hold there for 20 seconds. Carefully remove and set aside to dry.
Wash hands immediately after! Plaster of Paris can irritate skin if left on too long. Let dry 8-10 hours before painting.

Once dry, you can scratch their names or a message into the plaster with a bamboo skewer or a sharp point. You can also sand down the inside of the prints a bit with sand paper if you got any sharp ridges. Then, paint your little one’s hand and press into place. So cute! Your Valentine is going to LOVE!
Planning to try this at home? We’d love to see how it turns out! Send us photos of your crafty efforts and we’ll add them to our photo gallery!
.jpg)