This project comes from Jessica Begum, the crafty momma behind the blog Hipster’s Tea Party. Check out her tutorial for how to make your own snowglobe:
Snow globes have always intrigued my curiosity.
Ever since I was little, I’ve loved peeking in on little worlds through gingerbread house windows and tiny menageries.
That’s what makes this one of my favorite holiday crafts. Unlike a snow globe, there is no water in the jars of this craft, leaving a world of crafting possibilities! Epoxy and waterproof materials not necessary! I like to think of them as little display globes.
.jpg) Supplies
Supplies
- A handful of glass jars – Whatever is in cupboard. I used a jelly jar, a mason jar and a baby food jar.
- Gold spray paint or enamel paint for the lids
- White felting wool or cotton balls
- White glue
- Cardboard
- Scissors
- Glitter
- Assorted figurines, small trees, little forest animals, small mirrors, jewelry – Whatever you want to display!
Directions
Start by painting the lids and let dry completely. Overnight if necessary. Start with one jar and one lid. Practice setting up little scenes in the lid. I did this over and over until I figured out what was going in each jar, on each lid. Have fun! Get detailed or stay simple!

Once you have your scene, trace your lid onto the cardboard 3 times or more. This is to build your scenes up a bit so you can see it nicely through the jar. I learned this crucial step the hard way.
Cut your cardboard circles out about 1/4 – 1/2″ smaller than your tracing. You want them to fit in the bottom of the lid, leaving a generous space between cardboard and lid lip, so you can get your jar on with ease. Another “learned the hard way” step.
Stack a few to reach the appropriate height for your particular scene and jar.
Make sure your jar fits over everything! You don’t want squashed tree tops. Once again, learned the hard way. Yeah, these were pretty much a big ‘ole pain in the rear to figure out, I must admit. Easy breezy now though! Next, glue the cardboard stack in your lid.
 Tip: Use white cardboard if you’ve got it, or paint your little cardboard stack white. This will keep the snow nice and clean and will keep you from using too much. I learned this the… just kidding!
Now you can start assembling your scene using lots of glue! Hot glue works great if you’ve got a glue gun.
Take wisps of felting wool and layer over the cardboard. Glue down and add another layer. Start with just a little and build as you go.
Tip: You can take the mirrors out of old makeup compacts for little lakes in you scenes ;). I know you’ve got those lying around. I sure did!
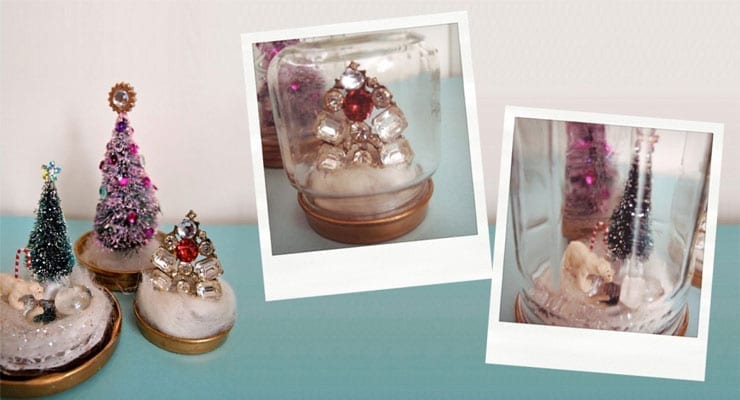
I used a little polar bear I found in my kids junk drawer, a red and white paper clip to make a candy cane, a little tree I glued glitter to, and compact mirror in one.
Then I let my 4-year-old dump glitter over the whole thing. So cute and sparkly!

In another, I painted one single tree pink in honor of my daughter who practically insisted we get a pink flocked Christmas tree. Sorry honey, but your momma’s not that hip. I finished it off with sequins and a scrapbooking embellishment for the top.
The little baby food jar I displayed one single piece. It’s an old broach of my grandmothers. It was the perfect tree shape and reminds me of her:

Assemble your jars and that’s it! Enjoy!

Jessica Begum is a crafty momma of two living on the west side of Los Angeles. Her blog Hipster’s Tea Party is mostly mom and kid friendly crafts, partly ideas for more ambitious projects, and a sprinkle of art and recipes thrown in just for fun. As well as being crafty, she is classically trained in fine art and loves to paint with watercolors and oils. You can join her in a craft, see her paintings, or get inspired at www.hipstersteaparty.com