Why Making Your Own Face Wash Is a Game-Changer for Busy Moms
DIY natural face wash is the perfect solution for moms wanting effective skincare without the mystery ingredients in store-bought products. It gives you control over ingredients, saves money, and is quick to make.
Quick DIY Natural Face Wash Benefits:
- Full ingredient control – no mystery chemicals
- Cost savings – up to 80% less than commercial cleansers
- Customizable – adjust for your exact skin type
- Gentle cleansing – perfect for sensitive skin
- Eco-friendly – reduces plastic waste and packaging
The process is simple, often using just 3-4 kitchen staples like honey, castile soap, and a nourishing oil. As one DIY skincare enthusiast shared: “I get so many questions about what skincare routine and beauty products I use. Most if not all of them are homemade, including this face wash.”
Why moms are making the switch: Commercial face washes often contain harsh sulfates, parabens, and synthetic fragrances that can irritate skin and disrupt hormones. A skincare reaction is the last thing a busy mom needs.
Best of all, you can make a month’s supply in under 10 minutes, and your kids can even help. It’s a win-win for your skin, budget, and time.

Why Choose a DIY Natural Face Wash Over Store-Bought?
We’ve all been tempted by store-bought cleansers promising miracles, but pretty packaging can hide harsh ingredients.
The biggest benefit of a DIY natural face wash is complete ingredient control. You know exactly what’s on your skin because you put it there yourself.
Commercial cleansers often use sulfates, which create a nice lather but strip your skin’s natural oils. This can lead to dryness, breakouts, and that tight feeling we all hate.
Then there are parabens, preservatives that can mimic estrogen and disrupt hormones. Research has even found them in breast cancer tissue. You can read more about parabens and their health effects if you want the full scientific breakdown.
The single word “fragrance” on a label can hide thousands of chemicals, including hormone disruptors. As busy moms, we don’t need our face wash adding to the hormonal chaos.
Here’s where homemade gets exciting: it’s incredibly cost-effective. A DIY recipe can cost just over $2, while store-bought versions run $25 or more. One bottle of liquid castile soap for about $17 makes about ten batches, offering significant savings.
Making your own cleanser also supports a sustainable beauty routine. Every time you refill a glass pump bottle instead of buying a new plastic one, you’re reducing waste. It’s a small change that feels good and makes a difference.
But my favorite part is the customization. Got oily skin? Add some witch hazel. Dealing with sensitivity? Keep it simple. You become your own skincare chemist, creating exactly what your skin needs.
The gentle cleansing from natural ingredients is remarkable. No harsh stripping, no irritation—just clean, happy skin. When you’re dealing with pregnancy hormones or postpartum skin changes, the last thing you need is a cleanser that adds to your problems.
Chemical-free doesn’t mean complicated. Simple, natural ingredients are often more effective than a cocktail of synthetic compounds.
Gathering Your All-Natural Toolkit: Ingredients & Supplies
Starting your DIY natural face wash is simple. You’ll need a few key ingredients and basic tools, many of which are already in your kitchen. You don’t need expensive equipment; a trip to a health food store or an online order will set you up for months.
Key Cleansing & Moisturizing Ingredients
These are your skincare pantry staples. The best part? You can pronounce every single one!
Raw honey is a skincare superstar. As a natural humectant, it draws moisture into the skin. Its antibacterial properties make it great for acne-prone skin, and it’s gentle enough for daily use.
Your cleansing base is liquid castile soap, a concentrated, plant-based soap. Always choose an unscented variety. While it has a higher pH, it works well when diluted with moisturizing ingredients.
Aloe vera gel is moisturizing, soothing, and anti-inflammatory. It’s helpful for acne, signs of aging, and general hydration.
When it comes to carrier oils, Jojoba oil mimics the skin’s sebum, making it great for all skin types. Coconut oil is moisturizing and antibacterial. Sweet almond oil is gentle for sensitive skin, and avocado oil is rich in vitamins for dry or mature skin.
Vegetable glycerin is another humectant that draws moisture to the skin and helps thicken your cleanser.
Distilled water is essential to prevent mold and bacteria growth. Never use tap water, as it can spoil your cleanser.
For extra benefits, infuse your water with dried herbs. Calendula soothes inflammation, chamomile calms, lavender helps with acne, and rose petals have astringent properties.
Essential Tools for a Smooth Process
You only need basic kitchen tools for this process.

A foaming soap dispenser or glass pump bottle is ideal for use and storage. Glass jars are best for mixing, as they don’t leach chemicals. A small funnel prevents spills, while measuring spoons and cups ensure consistency. You’ll also need a whisk or spoon for mixing.
Sanitizing your tools is crucial to prevent bacterial growth since these recipes lack synthetic preservatives. Wash everything with hot, soapy water or run it through the dishwasher before you begin.
Simple & Effective DIY Face Wash Recipes
Ready to start? These two DIY natural face wash recipes are simple and effective. One is for daily use, and the other offers gentle exfoliation.
Basic Honey & Castile Soap DIY Natural Face Wash Recipe
This popular recipe is a favorite because it’s gentle, quick to make, and leaves skin feeling soft and clean without the tightness caused by commercial cleansers.

Here’s what you’ll need:
- 1/3 cup raw honey
- 1/3 cup liquid castile soap (unscented is best)
- 3 tablespoons distilled water
- 2 tablespoons nourishing oil (jojoba, sweet almond, or fractionated coconut oil)
The mixing process is simple. Pour the distilled water into your pump bottle first to prevent honey from sticking. Then add the castile soap, honey, and nourishing oil. If using, add 5-10 drops of essential oils. Secure the lid and shake vigorously until everything is combined. Separation is normal, so just shake the bottle before each use.
To use, wet your face, dispense a small amount, and lather in your hands. Massage onto your face and neck for 30-60 seconds. Rinse with warm water, pat dry, and follow with toner and moisturizer. Your skin will feel clean and balanced.
Store in a cool, dark place for up to a month. Refrigerate larger batches to extend shelf life.
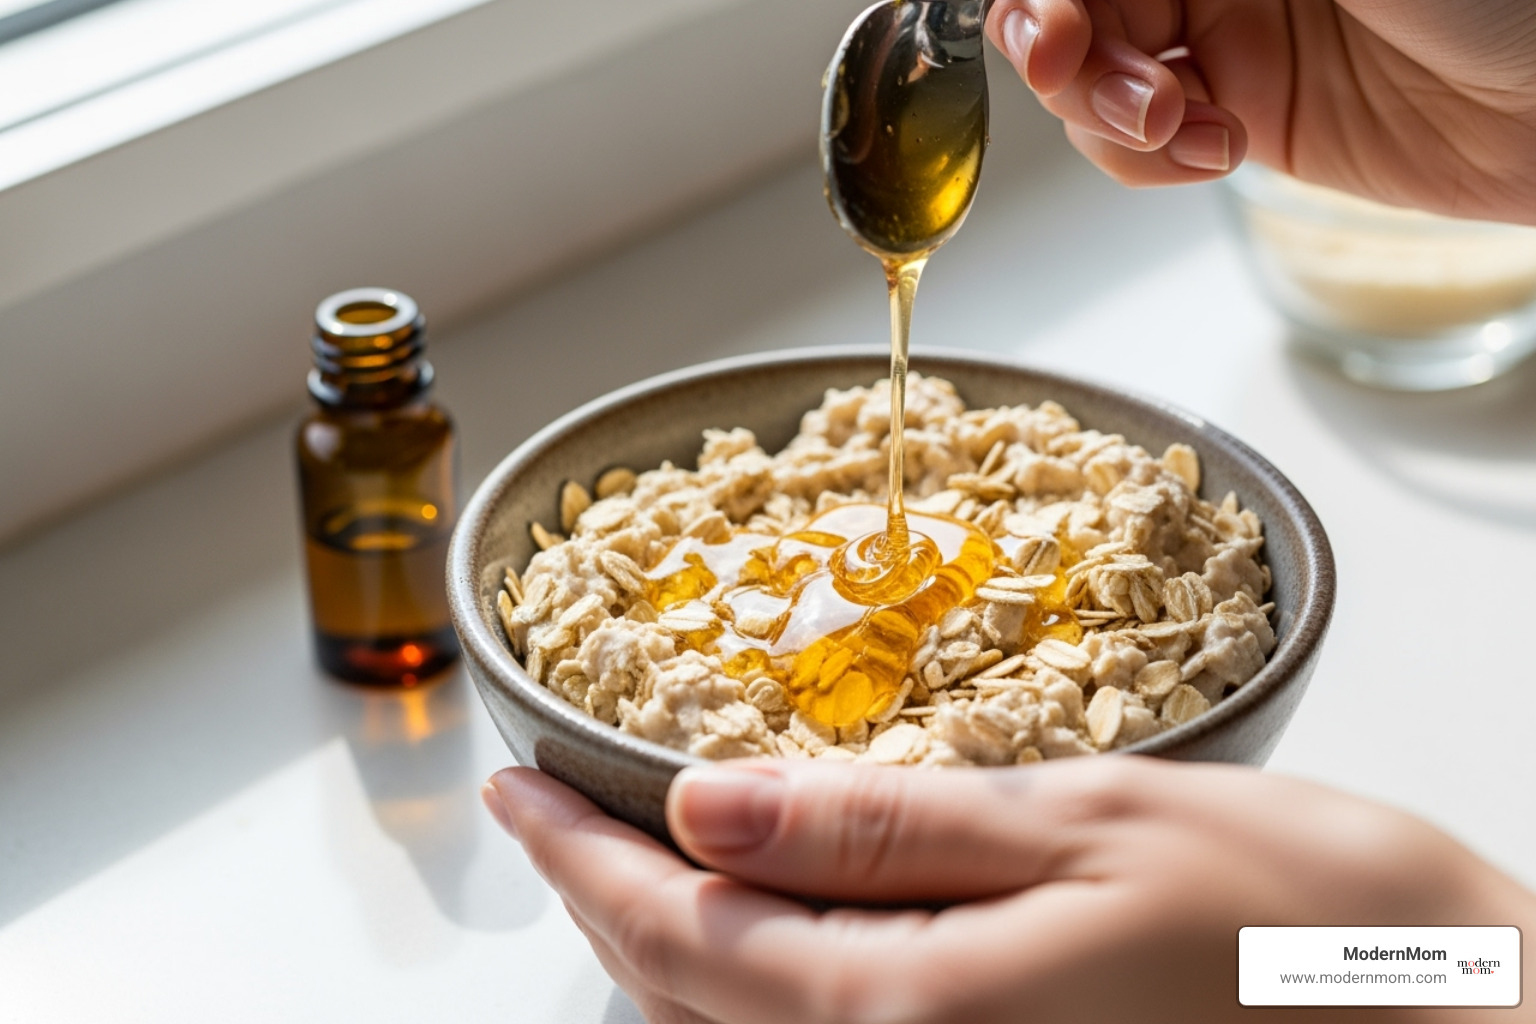
Gentle Oatmeal & Clay Cleanser for Exfoliation
For gentle exfoliation, this dry cleanser recipe is perfect. It’s a cleansing powder you mix fresh for each use, ensuring maximum potency.
You’ll need 2 tablespoons of finely ground oatmeal, 1 tablespoon of bentonite clay, and 1 teaspoon of dried herbs like lavender or chamomile.
To create your cleansing powder, mix all dry ingredients and store them in an airtight jar in a cool, dry place. It will stay fresh for months.
To use, mix about half a teaspoon of powder in your palm with a few drops of water, rosewater, or aloe vera gel to form a paste. Gently massage the paste onto your damp face. The oatmeal exfoliates while the clay draws out impurities. Rinse well and pat dry. Your skin will feel smooth and refreshed.
This method is great for sensitive skin because you control the texture and application pressure.
If you’re enjoying these DIY beauty trips, you might love exploring more recipes for mineral makeup to complete your natural beauty routine.
Customize Your Cleanser for Your Unique Skin
This is the fun part of DIY natural face wash—customizing it for your unique skin needs. Just like adjusting seasoning in a recipe, you can tweak your cleanser for different skin types or changing needs.
For Oily & Acne-Prone Skin
For oily and acne-prone skin, the goal is balance, not harsh stripping.
- Tea tree oil is antiseptic and anti-inflammatory, making it great for blemish control. Add 5-7 drops to your basic recipe.
- Witch hazel is a natural astringent that tightens pores and reduces oil. Replace a tablespoon of the water in your recipe with witch hazel.
- Lighter oils like jojoba can help regulate oil production because it mimics your skin’s natural sebum. Use 1-2 tablespoons.
- Bentonite clay is great for drawing out impurities. Add half a teaspoon to your mixture for a deep clean.
Mom tip: If you’re currently managing acne concerns while nursing, you might find our guide on using Proactiv while breastfeeding helpful for navigating safe treatment options.
For Dry & Mature Skin
For dry or mature skin that feels tight or shows fine lines, your cleanser should be extra nourishing.
- Geranium essential oil balances oil production and promotes a healthy glow. Add 5-7 drops.
- Frankincense essential oil helps reduce fine lines and promotes cell regeneration. Add 3-5 drops.
- Your carrier oil choice is key. Avocado oil is rich in vitamins. Increase the carrier oil to 2-3 tablespoons.
- Replace the distilled water with rosewater for extra hydration and a soothing scent.
- Vitamin E oil is a powerful antioxidant that protects and heals. Add half a teaspoon.
For Sensitive Skin
For sensitive skin, a gentle approach is key.
- Start with unscented castile soap to minimize potential irritants.
- Calendula and chamomile are soothing herbs that reduce redness. Use a cooled tea made from these herbs as your water base.
- If using essential oils, lavender essential oil is a gentle option for soothing skin. Start with just 3-5 drops.
- The golden rule is fewer ingredients. Start with a basic recipe (castile soap, honey, water, jojoba oil) and introduce new ingredients one at a time.
- Patch testing importance cannot be overstated. Apply a small amount behind your ear or on your inner arm and wait 24-48 hours to check for a reaction before using it on your face.
Storing Your Creation & Important Safety Tips
Now that you’ve made your DIY natural face wash, it’s crucial to store it properly. Unlike store-bought products, natural cleansers need care to stay fresh and safe.
How to Store Your Cleanser and How Long It Lasts
Think of your cleanser like fresh food; proper storage prevents bacteria. With the right approach, it will stay fresh for weeks.

- Airtight containers, like glass pump bottles, are best. They minimize air exposure, and glass is easy to sanitize.
- Refrigeration extends the shelf life, especially for recipes with fresh ingredients like aloe or herbal infusions. Keep a small bottle in the bathroom and the rest in the fridge.
- The shelf life depends on the ingredients. The basic recipe lasts up to 1 month in a cool, dark place. Recipes with fresh infusions or aloe last 1-2 weeks, even when refrigerated.
- Using distilled water is essential. Tap water contains bacteria and minerals that will spoil your cleanser quickly.
- Watch for signs of spoilage like an off smell, color changes, or mold. If you see any, toss it out and make a fresh batch.
Precautions for Your DIY Natural Face Wash
Natural doesn’t mean foolproof. Follow these precautions for a safe and effective skincare journey.
- Patch testing is a must. Test a small amount on your inner arm and wait 24-48 hours to check for irritation before using it on your face.
- Sanitizing equipment is your secret weapon against contamination. Since there are no synthetic preservatives, wash all tools in hot, soapy water or the dishwasher.
- Avoid the eye area. Castile soap and essential oils can sting and cause irritation. Use a separate oil-based remover for eye makeup.
- Some ingredients deserve extra caution. Raw lemon juice is too acidic and causes sun sensitivity. Baking soda is too alkaline and can cause dryness and irritation.
- Essential oils also require caution. Some can be too potent or cause photosensitivity (like citrus oils). Avoid “hot” oils like cinnamon. Always research proper dilution and safety. For more information, check resources on essential oil safety.
Frequently Asked Questions about Homemade Face Wash
Let’s answer some of the most common questions we get from the ModernMom community about DIY natural face wash.
Can I use DIY face wash to remove makeup?
Yes, most DIY natural face wash recipes remove makeup well, especially those with oil. Oil dissolves oil, so the carrier oils in your cleanser can break down foundation and even waterproof products. However, be mindful of eye safety, as castile soap and essential oils can sting.
For heavy makeup, try double cleansing. First, use a pure oil (like jojoba) to dissolve makeup, wipe it away, then wash with your DIY cleanser for a thorough clean without harsh scrubbing.
Speaking of makeup choices, if you’re curious about what goes into the products you’re removing, our article on the dangers of some mineral makeup offers some eye-opening insights.
Is it safe to use a homemade cleanser every day?
Absolutely! The gentleness of ingredients in a DIY natural face wash makes it ideal for daily use. Natural ingredients nourish while they cleanse, unlike harsh commercial products that can strip the skin.
The key is listening to your skin. If you feel tightness or see redness, it’s a sign to adjust your recipe. Adjusting recipes is easy. If your skin feels dry, reduce the castile soap or add more oil. Experiment with the castile soap concentration to find what works best for you. You can use it morning and night, adjusting the recipe as your skin changes with seasons or hormones.
Why does my DIY face wash separate?
This is completely normal and a good sign! Natural separation occurs because you’re using pure ingredients without the synthetic emulsifiers found in commercial products. Water, oil, and honey naturally separate over time, just like salad dressing. We avoid the emulsifiers that keep commercial products mixed.
A quick, vigorous shake before each use is all you need to blend it back together. This separation is a normal occurrence, not a sign of a problem. Just remember to shake before using to get the full benefit of all ingredients.
Conclusion
We hope you’re feeling excited and confident to take control of your skincare with DIY natural face wash. You now have the power to create gentle, effective cleansers for your specific skin needs.
You can avoid harsh chemicals like sulfates and parabens, creating a product that’s better for your skin, wallet, and the planet. The simplicity is liberating. With a few kitchen staples, you can make a month’s supply in under ten minutes. It’s a great way to teach kids about natural choices.
You’ve learned the benefits, from complete ingredient control to cost savings, and how to customize recipes for all skin types. You also know about proper storage, safety, and why your natural cleanser separates.
Most importantly, you’ve empowered yourself to make informed decisions. This is about embracing a natural, sustainable approach to beauty that fits a busy mom’s life. Your skin deserves this gentle care, and there’s deep satisfaction in using a product you made yourself.
Ready to explore more ways to simplify and naturalize your beauty routine? Explore more beauty hacks and natural solutions right here at ModernMom – because taking care of yourself naturally is one of the best gifts you can give your family.