“Home is where the heart is.” ~ Pliny the Elder
Baking and creating recipes to share is a huge part of what I love to do, but I also like to craft, and decorating for different seasons and holidays fills me with joy. Creating something beautiful is very fulfilling for me.
The wonderful thing about creating is there are no rules. Do what you feel moved to do. Make what you’re inspired to make. Whether that’s through baking one day, crafting the next, painting or writing, creative expression does not fit into a box, and there is no right or wrong way to do it. What’s important is that you express yourself in whatever way you feel enthused in your heart.
For me, art and God go hand in hand. Creating art is a spiritual practice. More than anything, art can often feel like it is expressed through us, not from us. Paint strokes of love and peace wherever you go, and you won’t have to worry about changing the world, you’ll be creating a new one.
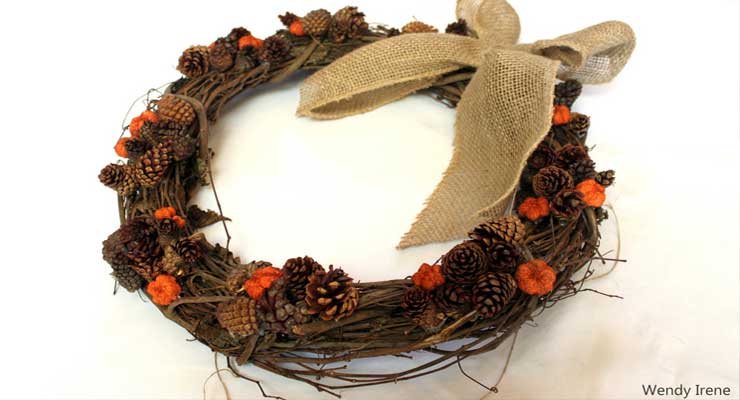
The instructions for this fall wreath are here to inspire you to create beauty in your home. Nature is a huge inspiration for me, and I love to make things that stay as true to nature as possible. By simply adding to the beauty that already exists right outside our windows, we can make home the best place to be.
.jpg)
Materials
- 4 dry quarts (4.4 liters) Mini Pinecones & Putka Pods* mix (I bought two bags of 2 dry quarts (2.2 liters) Mini Pinecones)
- Grapevine Wreath (18 inches across)
- Burlap Garland (5 ½ inches wide, cut a piece approximately 57 inches long)
- Glue sticks
- Floral Wire (30 inch piece)
Tools
- Scissors
- Hot Glue Gun
* Putka pods are small orange pods that resemble miniature pumpkins.
Directions
Insert glue sticks into your hot glue gun and preheat.
Once the glue is warm and ready to use, glue clusters of pinecones and putka pods by placing a decent sized dap of glue onto your wreath and pressing the pinecone into the glue. As the glue cools remove excess strings of glue while you work.
Each cluster of pinecones and putka pods on the wreath has an average of 6 mini pinecones, and 2 putka pods. However, I did vary the amounts slightly to give it a more random natural look. On some clusters a third putka pod was added or an extra pinecone.
.jpg)
After gluing your first cluster of pinecones and putka pods close together, space the next cluster about 2 inches away. Continue this pattern until you’ve gone all the way around the wreath.
.jpg)
.jpg)
Now it is time to prepare the burlap bow.
.jpg)
Take a piece of burlap tulle approximately 57 inches long and tie it into a regular bow. It doesn’t need to be fancy. Simple is pretty for this nature inspired wreath.
.jpg)
Take your piece of thin floral wire and fold it half to double it up. Push the bent side through the back of the bow knot.
.jpg)
Twist the wire a few times to secure it to the bow.
.jpg)
Select a spot on the wreath for the bow. Pass the floral wire through some of the wreath branches a few times and twist to secure the bow to the wreath.
Once you’ve attached the bow to the wreath decide how long you want the end pieces to hang down. Cut by folding the tulle in half and cutting upwards on the diagonal towards the folded side.
.jpg)
To hang the wreath, I used a small circular piece of metal wire that was already attached to my Grapevine wreath. It held the price tag onto the wreath. I slipped the metal ring onto a small screw hook attached to my door.
.jpg)
You could also easily hang the wreath by looping the floral wire you used to attach the bow around a hook, or by using a traditional wreath hanger.
.jpg)
The finished product!
.jpg) Enjoy and smile! You’ve added a beautiful fall touch to your home.
Enjoy and smile! You’ve added a beautiful fall touch to your home.
“Home is the nicest word there is.” ~ Laura Ingalls Wilder
Get inspired!
With love, gratitude, and fall beauty,
Wendy Irene