 Open the door, get on the floor… everybody walk the dinosaur!
It all started with a little wire and a big idea. With all the best intentions and holding the kids’ hopes and dreams in my mind, I soon ended up on my living room floor completely wrapped in a wire burrito wondering what I’d gotten myself into.
The next day, I created the deconstructed skeleton: broken down into feet, a tail, and a bodice-type area. Head and neck were to be added later, naturally, after seeing how this journey into the land of the lost really was going to turn out.
I started by simply having a discussion with each group of kids I met with, investigating the forms of dinosaurs themselves – the different lengths, heights, musculature, scales, teeth, you name it! The list in my head was getting longer and longer, and the kids were getting more and more excited. Here’s how we did it:
Supplies
- 3 rolls of 25-ft chicken wire (Ace, Home Depot)
- 1 25-lb bag of Plaster of Paris (Home Depot)
- newspaper, scrap paper, any recycled material galore
- white flour
- water
- wire cutter tool
- paintbrushes, gloves, messy art aprons (optional)
- glue (at least one 64-oz jug)
- washable paints in any colors your little ones choose!!
Directions
Using basic wire cutters, I put on gloves and cut directly across the chicken wire from top to bottom to make two identical pieces. Chicken wire is originally sold in a cylindrical rolled up tube, so it will retain its rolled shape for the most part, much like a poster or blueprint.
You will need to hold down the edges of where you want to cut, and trim in between the pieces to create a separated line. Once cut, you can bring both edges together and fold over each bit to create a tunnel-like shape, bringing the sharp edges together and underneath. This portion usually takes a while as you want it to be as safe to touch for your children as possible.
.jpeg) Once I had formed these into stumpy “feet”, they were ready to be filled, which the children really enjoy doing. (If you feel like you need extra protection, especially for younger ones, you can use masking tape or painter’s tape to fold over the edges that were cut as well.)
Once I had formed these into stumpy “feet”, they were ready to be filled, which the children really enjoy doing. (If you feel like you need extra protection, especially for younger ones, you can use masking tape or painter’s tape to fold over the edges that were cut as well.)
I searched the basement and grabbed an overflowing box of scrap paper, and got to work filling the exoskeleton pieces to the brim in order to make the foundation sturdy.
I discussed how we were using unwanted materials in a new way, creating something without wasting anything or overusing our resources. This will be easy to execute in the household as you can save flyers and ads from the mail, newspapers, old drawing papers, anything!
Our next step was to attach the pieces into a somewhat recognizable shape, and begin solidifying the frame into a sculpture. It was time to bring in the messy stuff. We needed glue, flour, water, plaster, and newspaper, and a lot of energy.

*School glue is available in larger milk jug containers either in store or on discountschoolsupply.com, flour available from any grocery store (or if you’re feeling adventurous, larger quantities can be purchased at Smart & Final); plaster was purchased in a 25-lb bag for a little over $15 at Home Depot, all you need to do is mix it with water, and stir to change texture.
I quickly became so wrapped up in this process that I couldn’t believe what was happening before my eyes. Once the children had given me the idea that they wanted to, in fact, create a dinosaur, my mind didn’t know where to go first. I spent President’s Day weekend in San Diego mulling this over…dinos were even on my mind while spending the day ogling marine life at Sea World. While waiting for a dinner table, I hopped over to Ace Hardware in Coronado and frantically bought out their entire supply of chicken wire. (I bought three of their pre-packaged rolls, under $20 each, and still had some left over after completion.)
I knew that with 75 feet of this stuff, something could be made.
 By the end of one school day, we had four feet, stumpy but stupendous, a lengthy tail, and one giant drum of a predatory belly. It was stuffed to the max and ready to be attached. At first I was convinced it was looking like a giant tooth, but with more time and inspiration from all the little ones, the prehistoric became possible! By the time I needed a ladder to reach the neck, I knew I was doing my job right.
The entire school came together and mixed flour, glue, and water into a lumpy liquid (much like a paper mache). We spread it over layers of newspaper using paintbrushes, gloves, or our hands, and wrapping each piece around the dino parts until it because hefty, hearty, and well…heavy. After days of this messy process (honestly, I’ve never had a bigger pile of speckled laundry), every bit of the wire was covered. Luckily, the warm weather made for some quick drying between the layers of goop.
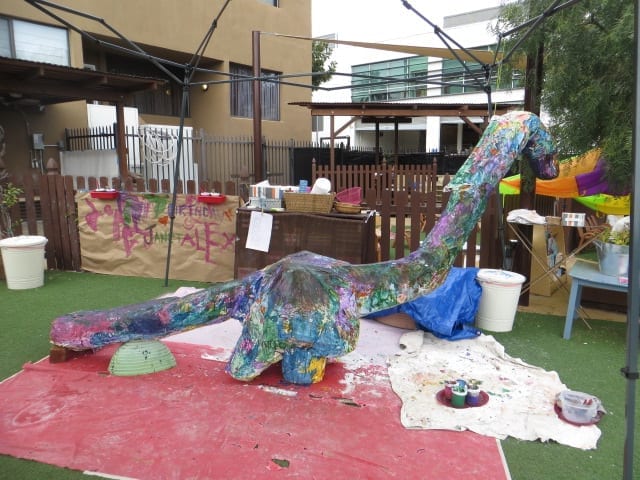
The last couple of days we took it up a notch, finalizing our fossilized creature with a thicker coat of plaster. This not only transformed our mushy monster into a solidified sculpture, but also covered up the endless Calvin Klein ads and stock market statistics with a barrage of bright white.

Now we had a beautiful blank canvas.
What’s next, you ask? As if you weren’t exhausted enough by now? Our young sculptors simply put on their painter caps and covered him up from head to toe with color.
The most daunting task for me was to figure out where to keep this creation, as there is lack of spare gallery space here on the Westside. 😉
The finalized work:

The last thing to do was to name her. Rosie the Brontosaurus is what we ended up with. Full name: Rosie-Clint-Bechkame-Star-Hello Guy-Ice Cream-Rainbow-T-Rex-Princess-Freddy-Skeleton-Spotty.
She’s three weeks old (how long it took to create her), enjoys leisurely lunches chewing on the finest organic kale (get it, because she’s an herbivore?), and long walks through the La Brea tar pits.
This was and still is quite possibly shall remain the greatest, biggest project I’ve ever taken on. The entire population of a preschool had their hand in its making, and now I want to share it with you. 🙂